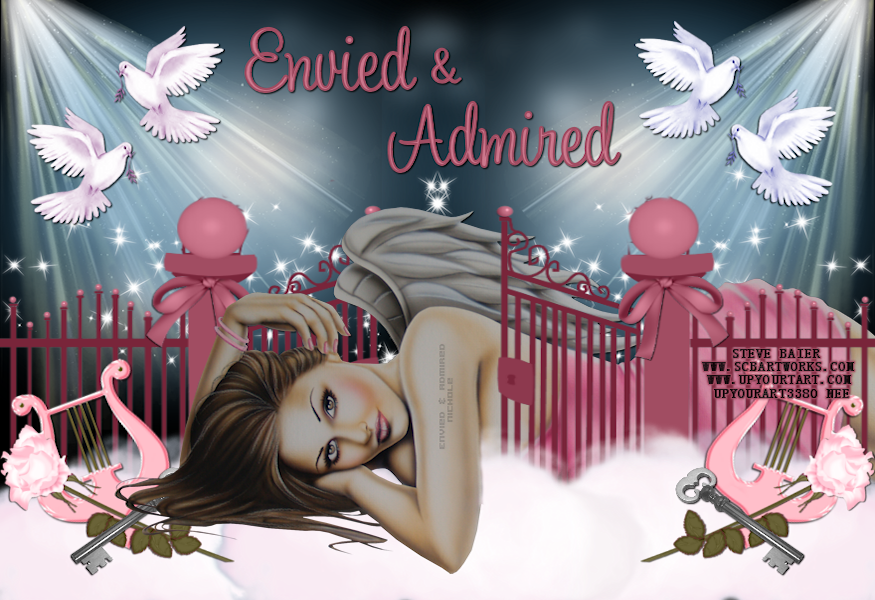
Shani is the Bomb!!! She made my night!! This tag so fits me...lol
She used my template #2 and my FTU "Royalty Kit". Please stop by and check her tutorial out and leave her some love!
HERE
Posted in
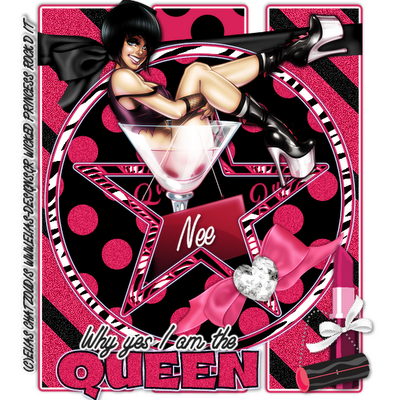
Made for Me
by Nichole {Nee}
|
Supplies Needed:
PSP X2
Scrapkit called "Pretty Pretty Princess" by Alyssa
I am using Pinuptoons which you can purchase from CILM
Fonts: Times New Roman, TheNautiGal
Plugins: Eye Candy 4000 Gradient Glow, Xero:Grayscaler
Mask of choice
Lets Begin:
Open supplies minimize
New Raster 600x600
Select your ellipse tool
Select Circle
background set on null
Foreground:f0cbcb
Width: 10
Line style:solid
Draw out a pretty decent size circle
Objects, align center
Select your text I am using Times New Roman
Click the white arrows by the color to swap the background and foreground
Change create as to Floating
Type the phrase
"Still waiting on my prince charming"
or phrase of choice
New raster layer
Move under floating selection
Selections, Select None
Apply Gradient Glow Settings
3
25
100
Color
Fat
Dropshadow
2
-2
21
2
Convert the circle to a raster layer
Take your magic wand click inside
Selections, Modify, Expand 4
Paste paper 5 as new layer
Selections, Invert, Delete
Do Not Deselect.
Move paper 5 under circle layer
Paste castle as new layer
Resize 75%
Hit delete on keyboard to remove any extras
Dropshadow keep settings
Paste tube as new layer
Resize 85%
Hit delete on keyboard
Selections, Select None
Duplicate tube layer
On original layer apply xero grayscaler
255
0
0
Duplicate layer
Adjust
Blur
Gaussin Blur: 3
Change blend mode to Soft Light
Paste paper 7 as new layer
Send to bottom
Apply Mask
Paste bow2 as new layer
Resize 35%
position as mine
Duplicate, Image, Mirror
Paste carriage as new layer
Resize 25%
Position as mine and dropshadow
Keep settings
Repeat for shoe
Paste doodle 2 as new layer
Resize 65%
Move above mask layer and positon top left (see mine)
Duplicate Image Mirror
Merge Down
Duplicate Image Flip
Paste Butterfly 4 as new layer
Resize 25%
Free Rotate Left 15
Position top right as mine
Duplicate and positon bottom left as mine
Paste heart frame 2 as new layer
Resize 10%
Free rotate left 15
position as mine top right
Open bead string with crown, crop it so all you have is the crown, erase any extras
Paste as new layer
Free Rotate left 75
position as mine. Dropshadow
Apply copyright and license info
Type your name 72px
Color of choice to match
Convert to raster
Gradient Glow
Dropshadow
Keep settings for both
Free rotate left 15 and position as mine or as desired.
Resize tag if desired and save as .png for transparent background.
Thank you for trying my tutorial
XoXo,Nee
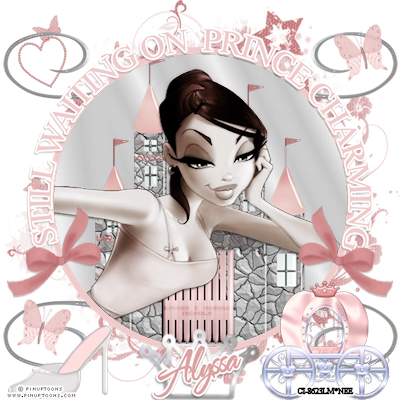
Posted in
Tutorials PTU
by Nichole {Nee}
|
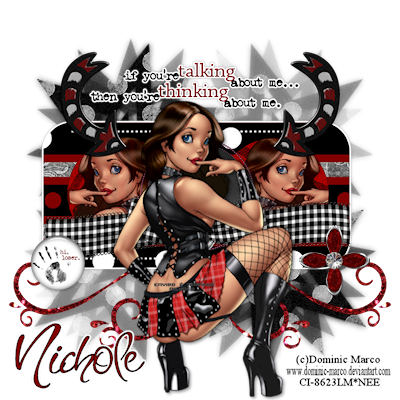
Supplies Needed:
PSP X2
Jealousy kit by Helly you can purchase at Paradise4scrappers
Tube by Dominic Marco you can purchase from CILM
Tag Template 206 by Missy
Plugins: Eye Candy 4000 Gradient Glow
Mask 341 by Vix
Font: Inspiration
Lets Begin:
Open Mask and minimize
Open template, delete copyright and resize canvas size 700x700
Delete white background layer
Select the rectangle layer
Selections, Select All, Float, Defloat
Paste Paper 9 as new layer
Selections, Invert, Delete
Selections None
Apply Gradient Glow
Settings
3
37
100
Color
Fat
Dropshadow:
0
0
35
7
Cirlce 2
Selections, Select All, Float, Defloat
Paste Paper 9 as new layer
Selections, Invert, Delete
Do not deselect
Paste tube as new layer, invert, delete
Selections None
Change opacity of tube layer to 84
Repeat for Circle 1
Circle 3 and dotted Cirlce
Selections, Select All, Float, Defloat
Paste Paper 3 as new layer
Selections, Invert, Delete
Selections None
Paste tube as new layer
Resize if needed
Apply Dropshadow
3
3
35
7.10
Paste word art 1 as new layer
Apply Gradient Glow keep settings
Position to top of tag, see mine
Paste Paper 6 as new layer
Send to bottom
Layers, New mask layer, from image, select mask, hit ok, delete mask layer, merge group
Duplicate mask layer on duplicated layer
Effects, texture fur
25
90
11
44
Move below original
On original layer
Adjust add remove noise
Add noise
uniform
20
monochrome checked
Paste black ribbon as new layer, resize 65%
Move below tube layer
Erase edges so it looks like its on the frame
Paste Swirl 2 as new layer
Move above mask layer
Position bottom left side
Duplicate, Image, Mirror
Paste Loser button as new layer
Resize 35% & position as mine
Paste arrow as new layer
Resize 35% & position as mine
Dropshadow
0
0
30
7.25
Duplicate, Image, Mirror
Paste Brad 1 as new layer
Resize 65% & position as mine
Dropshadow keep settings
Apply copyright and license info
Write your name and apply gradient glow if you choose keep settings.
Resize if needed and save as .png
Thank you for trying my tutorial
XoXo, Nee
Posted in
Tutorials PTU
by Nichole {Nee}
|
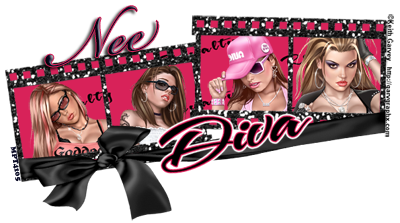
My girl Michelle made me first tag with my kit.
I love it. Thank you so much!!!! Hugs!!
Posted in
Made for Me
by Nichole {Nee}
|