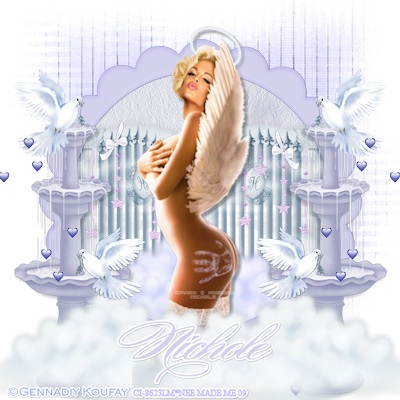
"Heaven" Tutorial 15 PTU
Sunday, May 31, 2009

Supplies Needed:
PSPX2
My Heaven Sent Kit HERE
Tube of Choice: I am using Gennadiy Koufay you can purchase at CILM
Mask of choice
Font used: Burgues Script
Lets Begin:
New raster 700x700 transparent, or white whatever you like to work with
Paste frame 10 as new layer...dont freak if its blank...lol
Resize 35%
Take your magic wand click in the middle
Selections, Modify, Expand 4
Paste Paper 2 as new layer
Selections, Invert, Delete
Move below frame
Dont deselect
Open gate position to the right
Dropshadow
0
0
21
6
Duplicate Image Mirror
Hit delete on each layer of gate to remove the excess
Paste cloud 1 as new layer
Position to the bottom of gates hit delete
Dropshadow keep settings
Hit delete
Selections Select None
Paste drops 4 as new layer
Resize 40%
Position so they look like they hanging on the gate
Paste bow 3 as new layer
Resize 30%
Position as mine
Duplicate Image Mirror
Paste tube as new layer
Send to top
Duplicate
Move the duplicate layer below frame
Erase and extras off the bottom so it looks like she is behind the frame
Dropshadow bottom layer
5
5
21
5.00
Paste fountain 1 as new layer
Position as mine and dropshadow
Duplicate Image Mirror
Pick a dove and paste as new layer
Position as mine or as desired on the fountain
Duplicate and Mirror
Repeat if you use more than one set
Paste cloud 3 as new layer
Dropshadow
1
1
21
2
Position bottom right by base of fountain
Duplicate Image Mirror
Paste heart doodle 1 as new layer
Positon above fountains and below clouds
Duplicate Image Mirror
Paste paper of choice as new layer
Send to bottom
Apply Mask
Apply copyright and license
Add your name
Save as a .png for transparent background
Thank you for trying my tutorial and using my kit
XoXo, Nee


0 comments: to “ "Heaven" Tutorial 15 PTU ”
Post a Comment