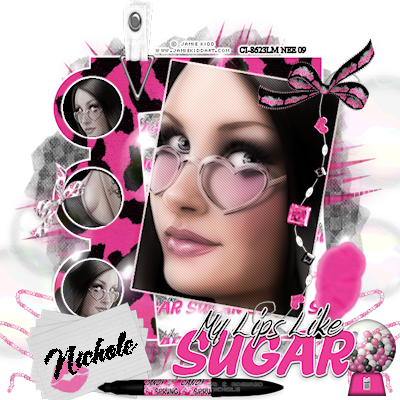
"My lips like sugar" Tutorial 17 PTU
Tuesday, June 2, 2009

Supplies Needed:
PSP X2
"My lips like sugar" by Missy. You can purchase at Scraps With Attitude
Template 177 by Missy at Divine Intentioz
Tube by Jamie Kidd you can purchase from CILM
Plugins: Eye Candy 4000-Gradient Glow
Penta.com Jeans
Mask of choice
Font: A&S Snapper Script
Lets Begin:
Open supplies and minimize all but template
Delete copyright layer
Resize canvas 600x600
Delete white background
Select the Shape layer
Selections, Select All, Float, Defloat
Paste Paper19 as new layer
Selections, Invert, hit delete on keyboard
Effects, Plugins, Eye Candy, Gradient Glow, Settings:
3
25
100
Click on Color tab
Select Fat
Hit ok
Selections, Select None
Select the Circle layer
Selections, Select All, Float, Defloat
Crop a piece of your tube and paste as new layer
Position on top circle
Selections, Invert, Delete
Paste another in the middle and hit delete
Repeat for third circle
On the circle layer apply Gradient Glow keep settings
Select one of your tube layers
Duplicate layer
On the duplicated layer
Adjust, blur, gaussian blur 10
Change blend mode Soft Light
On orginal tube change blend to Luminance (L)
Back to Duplicated layer
Effects Plugins Penta.com Jeans Settings
Amount 62
Border width 4
Repeat for each piece of tube
Select the Rectangle layer
Selections, Select All, Float, Defloat
Paste Paper3 as new layer
Resize 75%
Selections, Invert, Delete
Apply Gradient Glow same settings
Selections, Select None
Paste close up of tube as new layer
Resize 75% if needed
Image, Free Rotate, Right 12
Position over rectangle 2
Select Rectangle2 layer
Selections, Select All, Float, Defloat
Select your tube layer,
Selections, Invert, Delete
Duplicate tube
On duplicated layer
Adjust, Blur, Gaussian Blur 10
Change Blend Mode to Overlay
Orginal tube layer change blend mode to Luminance (L)
Back to duplicated layer
Apply Penta.com Jeans
Settings
34
4
Apply Gradient Glow to rectangle 2 layer
Apply Dropshadow
3
-2
21
10.26
Paste Paper 14 as new layer
Send to bottom
Layers, New mask layer
From Image
Select your mask
Source luminance checked
Hit ok
Delete mask layer on the side
Merge Group
I did an another mask using paper 15 * this is optional* Repeat above steps if you use 2 masks
Paste wordart 1 as new layer
Resize 40%
Position as mine
Dropshadow keep settings
Paste bubbles as new layer
Position under rectangle 2 layer
Change blend mode to screen
Paste bow 4 as new layer
Resize 15%
Dropshadow
Free Rotate Left 5
Position by middle circle on left
Paste beads as new layer
Resize 55% Position as mine
Paste bow 1 as new layer
Resize 25%
Position as mine on top of beads
Paste note cards as new layer
Resize 25%
Position bottom left
Paste pink lips as new layer
Resize 10%
Place on card as desired and change opacity to 71
Paste Marker 2 as new layer
Resize 35%
Position as mine and dropshadow
Paste buckle 3 as new layer
Resize 15%
Position as mine
Paste bubblegum machine as new layer
Resize 25%
Position under word art bottom right
Paste cotton candy as new layer
Resize 30%
Position under wordart
Free Rotate Right 10
Paste sequins2 as new layer
Resize 25%
Position under note cards
duplicate, image,mirror
Apply license info & copyright
Select font tool
A&S Snapper Script
48px
Stroke width 1
Kerning 0
Type your name Free Rotate Left 15
Position on cards
Change blend mode to Dissolve
Save as .png for transparent background
Thank you for trying my tutorial
XoXo,Nee


0 comments: to “ "My lips like sugar" Tutorial 17 PTU ”
Post a Comment